 GaⅤin.com by Gavin W.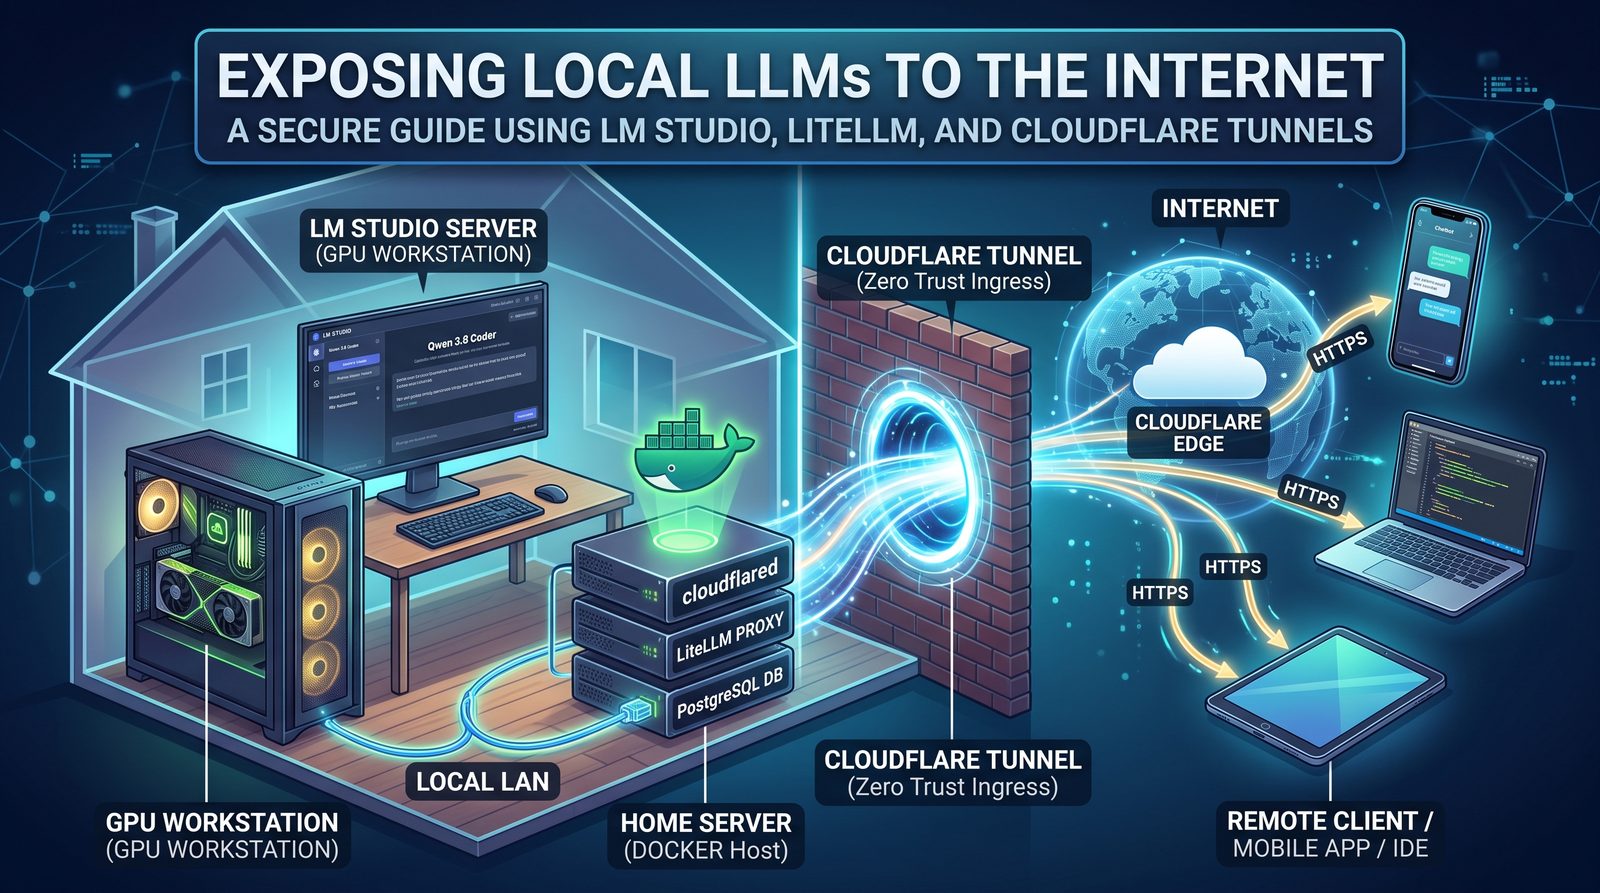
Self-hosting LLMs is a powerful way to take control of your AI use. There are plenty of benefits, from complete privacy and zero subscription fees to avoiding rate limits. These days, it’s easy to run models on the exact machine you’re sitting in front of. But what if you want to query your home GPU from your laptop while traveling? Or hook your local models up to a mobile shortcut on your smartphone?
Exposing local services to the internet securely without opening router ports or messing with dynamic DNS can be tricky. In this guide, I’ll walk through how I set up my personal stack using LM Studio, a Dockerized LiteLLM proxy, and Cloudflare Tunnels.
In my setup, the heavy lifting is split across two machines on my local network:
- GPU Workstation: A Windows machine equipped with an NVIDIA GeForce RTX 5060 Ti (16 GB VRAM) running LM Studio.
- Home Server: A separate, always-on Linux box hosting the Docker containers (LiteLLM, PostgreSQL, and
cloudflared).
Running the proxy on a separate machine keeps the Cloudflare tunnel and API gateway online 24/7, even if the GPU rig is sleeping, rebooting, or doing other work.
Overview & Architecture
Here is what the overall architecture looks like:
[ Remote Client / Mobile App / IDE ]
                    │ (HTTPS)
                    ▼
       [ Cloudflare Edge + Tunnel ]
                    │ (Zero Trust Ingress)
                    ▼
┌─────────────────── Docker Host (Home Server) ───────────────────┐
│                                                                 │
│  [ cloudflared ] ───> [ LiteLLM Proxy ] <───> [ PostgreSQL DB ] │
│                             │                                   │
└─────────────────────────────┼───────────────────────────────────┘
                              │ (Local LAN: http://192.168.x.x:1234)
                              ▼
┌─────────── GPU Workstation (RTX 5060 Ti 16GB) ──────────────────┐
│                                                                 │
│                     [ LM Studio Server ]                        │
│                (JIT Model Inference Engine)                     │
│                                                                 │
└─────────────────────────────────────────────────────────────────┘
- LM Studio (GPU Host): Handles GPU model execution on the RTX 5060 Ti and serves an OpenAI-compatible API over the local LAN.
- LiteLLM + PostgreSQL (Docker Server): Manages authentication, per-app virtual keys, model aliases, fallbacks, and usage tracking.
- Cloudflare Tunnels (
cloudflared): Creates an encrypted, outbound-only tunnel to expose LiteLLM safely to the web with zero open inbound firewall ports.
1. Setting Up LM Studio for Local Inference
There are several tools available to run local LLM inference, but LM Studio stands out for its straightforward UI, excellent quantization support, and native Just-In-Time (JIT) model loading and auto-eviction.
Recommended Models for a 16GB VRAM Setup
With an RTX 5060 Ti 16 GB, you have plenty of room to run modern, highly capable models with generous context windows:
- Qwen 3.8 / Qwen 3.8 Coder: Fast, intelligent, and fits easily within 16 GB VRAM with large context windows. Excellent for day-to-day coding, tool use, and general agentic workflows.
- Nemotron Flash: NVIDIA’s high-efficiency architecture that delivers blistering inference speeds and low latency on RTX hardware.
- Gemma 4: Google’s latest compact powerhouse with stellar reasoning and conversational performance in a lean memory footprint.
When loading your chosen model in LM Studio, check the box to “Remember these settings for…” so the model boots with your tuned context size and GPU offload parameters every time.
Server & JIT Settings
Because this machine is a daily driver workstation, we don’t want VRAM permanently locked when the model is idle.
Under Settings > Developer, enable Developer Mode and configure your memory management:
- JIT Models Auto-Evict: ON — Frees VRAM when requests stop.
- Max Idle TTL: 5–10 minutes — Grace period before unloading the model (Note: The first request after an idle period takes a quick 2–5 second warmup while the model reloads).
Next, open the Developer tab on the left-hand navigation pane to configure the local server:
- Serve on Local Network: ON — Binds to
0.0.0.0so our separate Docker server can reach LM Studio over the LAN. - Just-in-Time Model Loading: ON — Loads models automatically on incoming requests.
- Auto Unload Unused JIT Loaded Models: ON — Cleans up models when not actively queried.
- Only Keep Last JIT Loaded Model: ON — Ensures only one active model occupies VRAM at a time.
- Authentication: OFF — Authentication is handled at the LiteLLM gateway layer.
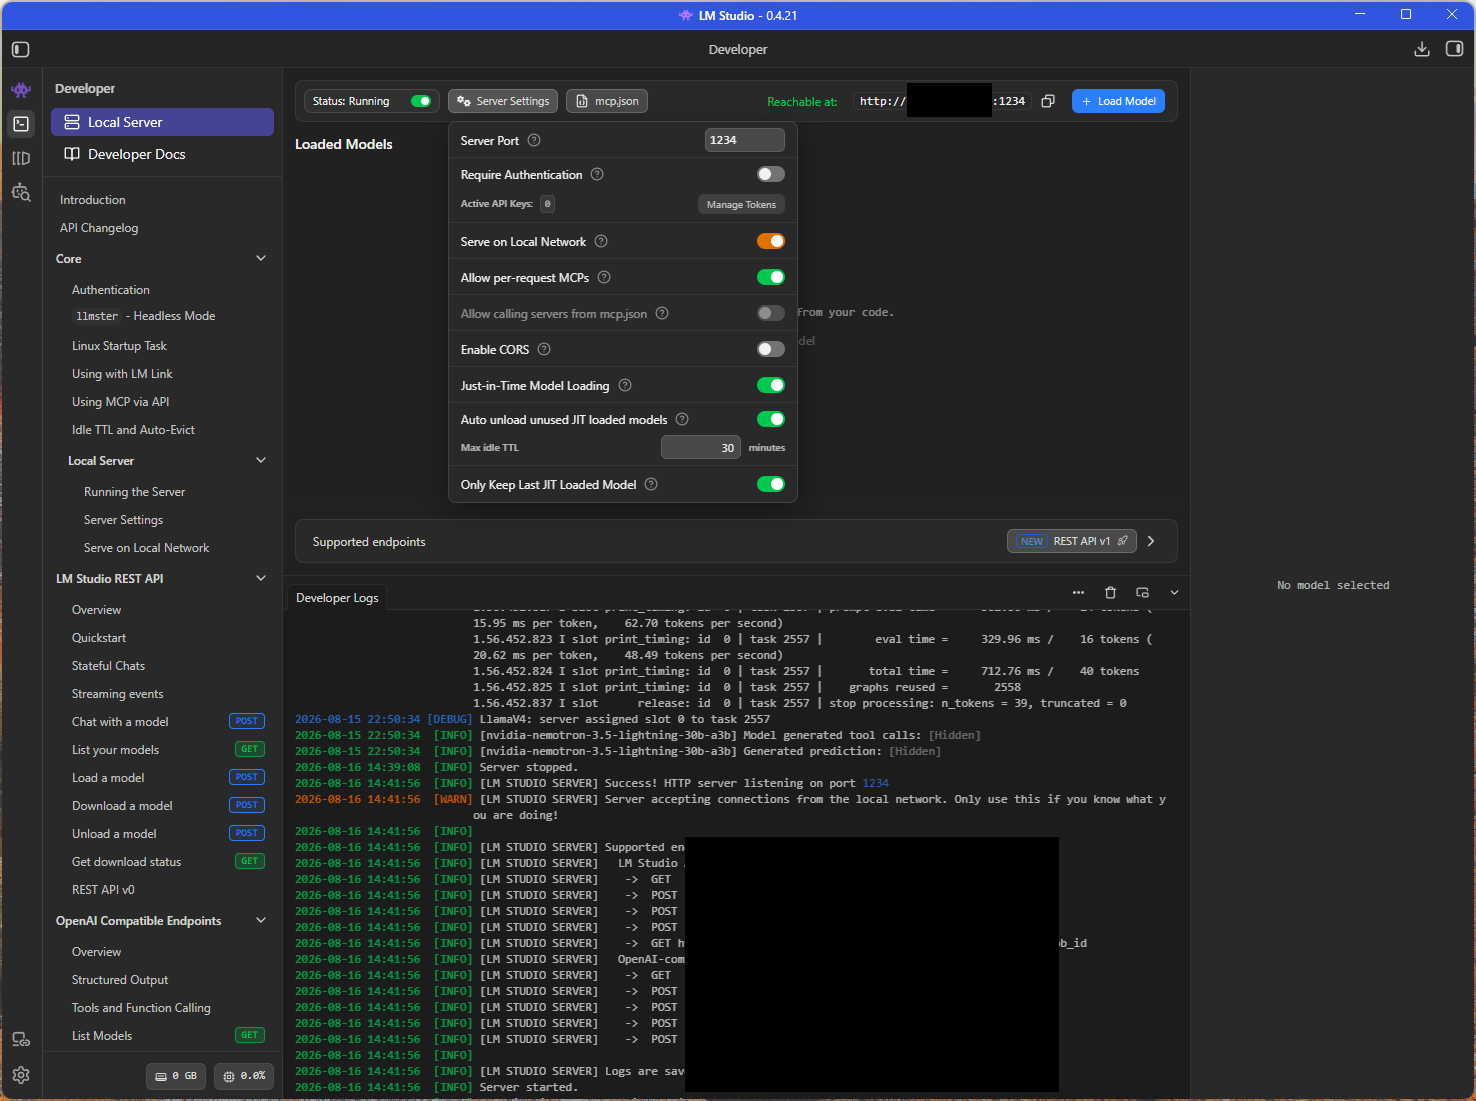
Click Start Server. It will show Reachable at: http://192.168.x.x:1234. Make note of your GPU machine’s local IP address and port.
2. Deploying LiteLLM via Docker
Next, we set up LiteLLM on our dedicated server machine. Placing LiteLLM in front of LM Studio provides several major advantages:
- Virtual Keys & Auth: Issue unique API keys to each device, app, or agent, and revoke or rate-limit them individually.
- Unified Logging & Spend Tracking: LiteLLM tracks token usage and request latency in PostgreSQL.
- Abstraction & Fallbacks: If your GPU workstation is powered off or rebooting, LiteLLM can automatically fail over to a secondary model or paid cloud API.
docker-compose.yaml
On your Docker host machine, create your docker-compose.yaml:
services:
  litellm:
    image: ghcr.io/berriai/litellm:main-latest
    ports:
      - "4000:4000"
    volumes:
      - ./litellm_config.yaml:/app/config.yaml:ro
    environment:
      - DATABASE_URL=postgresql://litellm:[PASSWORD]@litellm-db:5432/litellm
      - LITELLM_MASTER_KEY=[ENCRYPTION_KEY]
      - LITELLM_SALT_KEY=[ENCRYPTION_KEY]
      - STORE_MODEL_IN_DB=True
    command: ["--config", "/app/config.yaml", "--port", "4000"]
    depends_on:
      litellm-db:
        condition: service_healthy
    restart: always

  litellm-db:
    image: postgres:16-alpine
    environment:
      POSTGRES_USER: litellm
      POSTGRES_PASSWORD: [PASSWORD]
      POSTGRES_DB: litellm
    volumes:
      - postgres_data:/var/lib/postgresql/data
    healthcheck:
      test: ["CMD-SHELL", "pg_isready -U litellm -d litellm"]
      interval: 5s
      timeout: 5s
      retries: 5
    restart: always

  cloudflared:
    image: cloudflare/cloudflared:latest
    command: tunnel --no-autoupdate run --token [CLOUDFLARE_KEY]
    restart: always
    depends_on:
      - litellm

volumes:
  postgres_data:
Note: Replace
[PASSWORD]with a strong DB password, and[ENCRYPTION_KEY]with a 32-character key. Keep your master key secure—it provides admin access to the LiteLLM dashboard.
Create a minimal litellm_config.yaml file in the same directory:
model_list: []
Because STORE_MODEL_IN_DB=True is enabled, all model configurations and virtual keys persist inside PostgreSQL and are managed through the web UI.
Start the stack:
docker compose up -d
Adding Models & Virtual Keys
Open your browser to http://<DOCKER_HOST_IP>:4000/ui and log in with your LITELLM_MASTER_KEY.
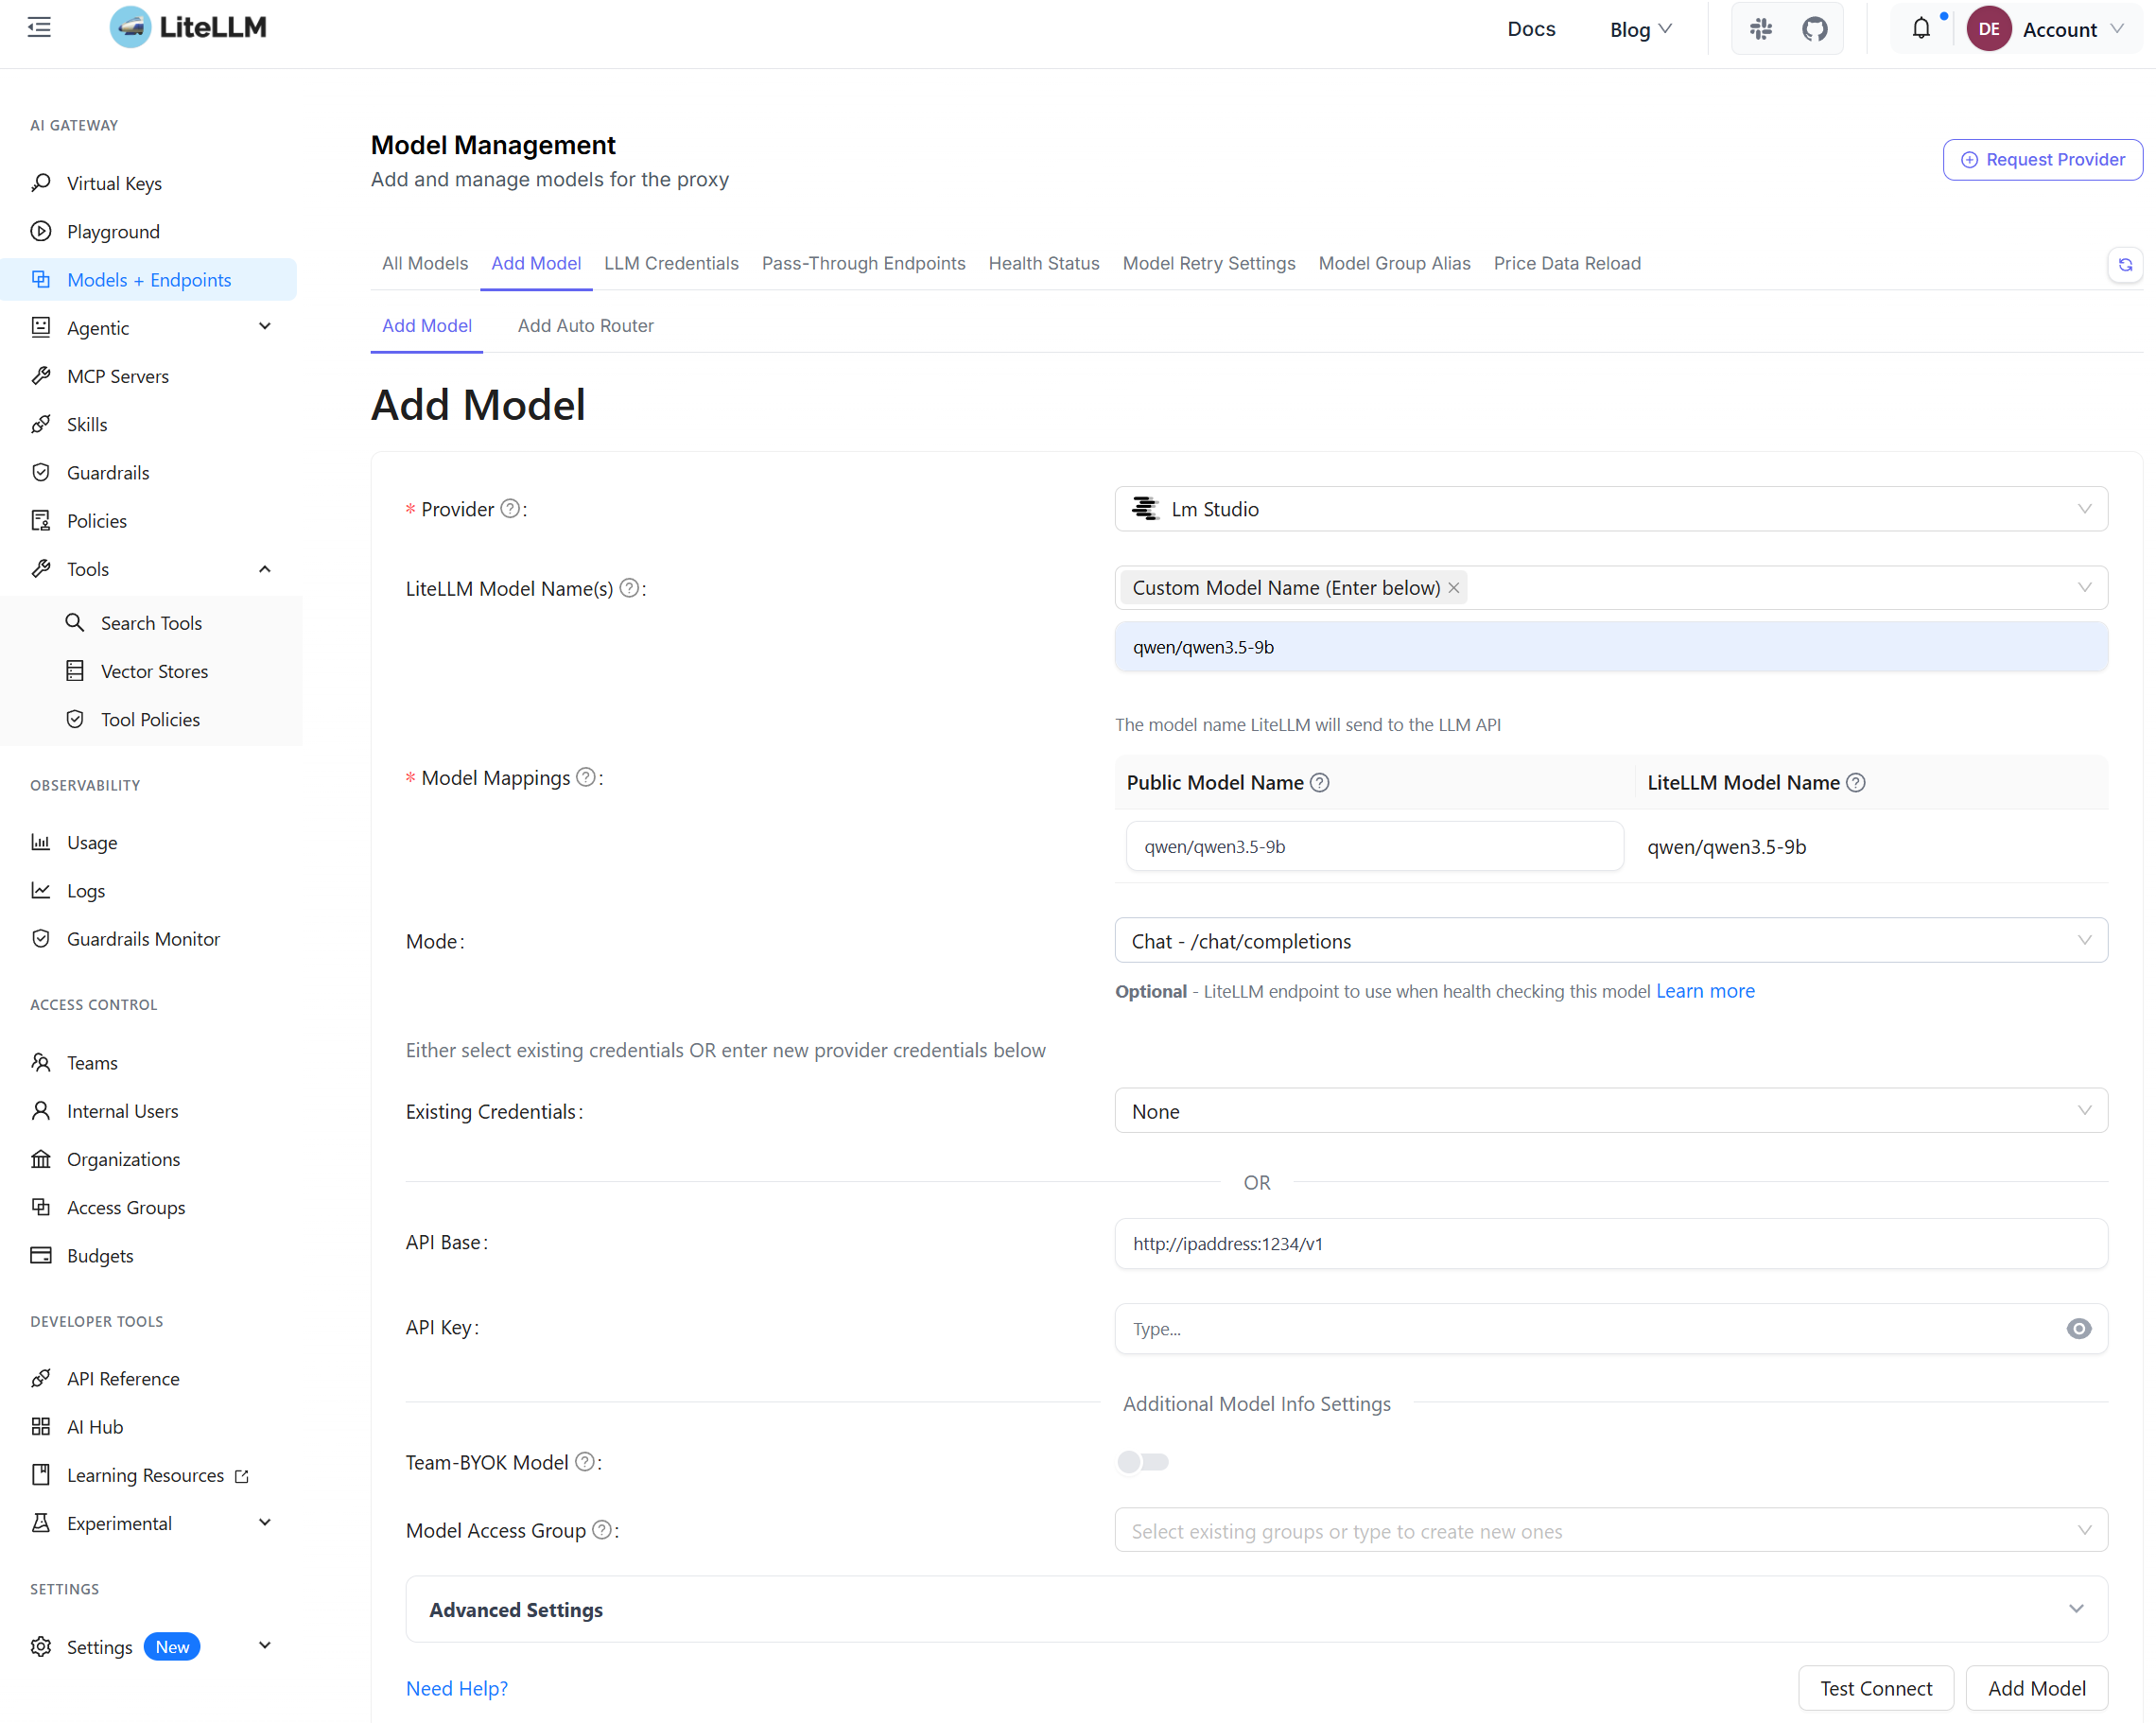
To register your local GPU model:
- Go to the Models + Endpoints tab and click Add Model.
- Provider: Select
LM Studio(orOpenAI Compatible). - LiteLLM Model Name: Enter a model name (e.g.
qwen-3.8or wildcardAll LM_STUDIO Models (Wildcard)). - API Base URL: Point to your GPU workstation’s local LAN IP:
http://192.168.x.x:1234/v1/.
To finish up:
- Head over to the Virtual Keys tab and click + Create Key to generate an API key for your client apps.
- Open the Playground tab, select your model, and send a test prompt to verify that LiteLLM is proxying requests to your GPU workstation.
3. Secure Ingress with Cloudflare Tunnels
With our local stack working, we now connect it to the internet through Cloudflare Zero Trust.
Creating the Tunnel
In the Cloudflare Zero Trust Dashboard, navigate to Networks > Tunnels > Add a tunnel:
- Select Cloudflared, give the tunnel a name, and copy the provided token into your
docker-compose.yamlunder[CLOUDFLARE_KEY].
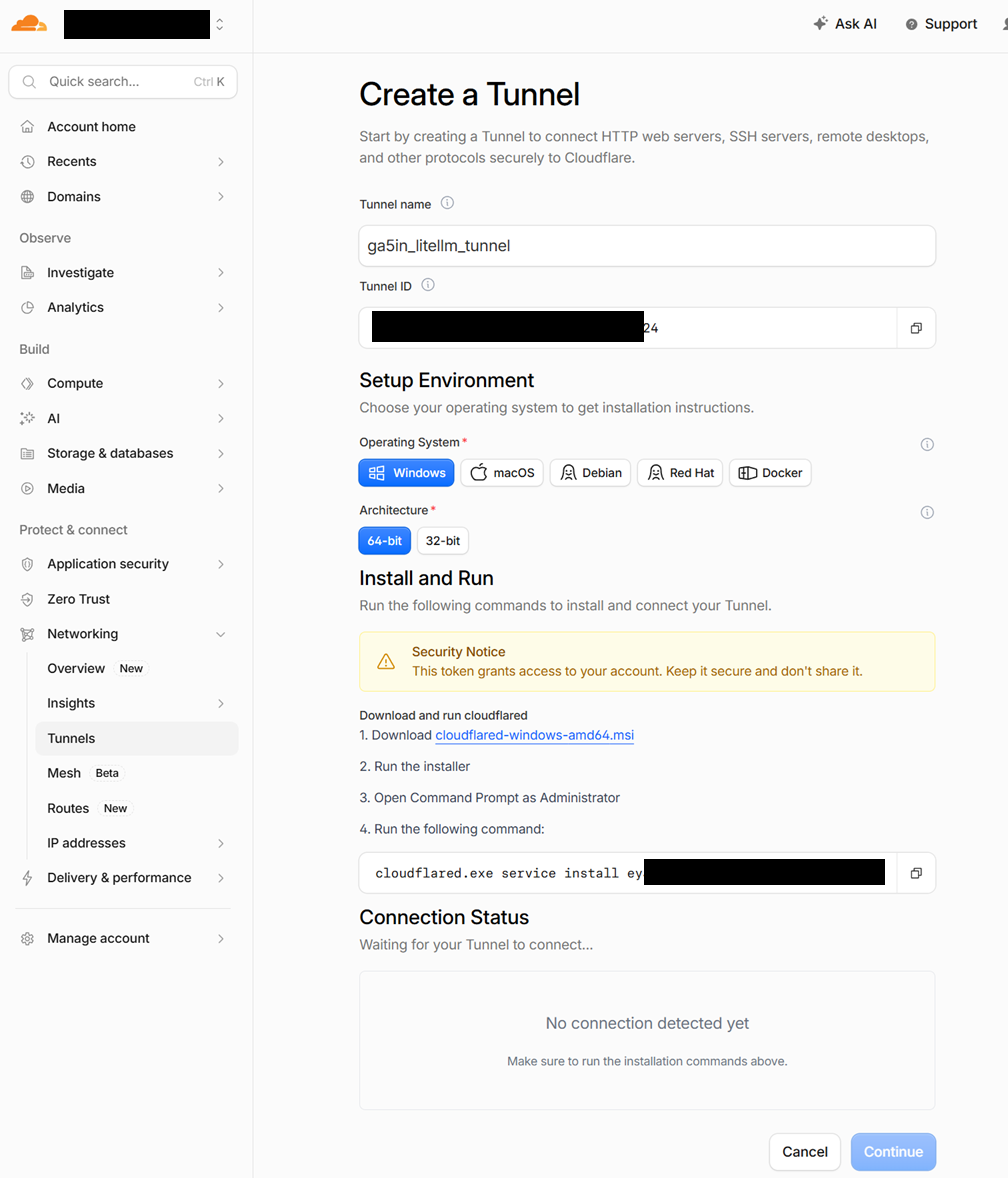
- Restart
cloudflared(docker compose up -d), and the tunnel will show as Healthy in Cloudflare. - Under Public Hostnames, add a route:
- Subdomain: e.g.,
ai(givingai.yourdomain.com) - Service Type:
HTTP - URL:
litellm:4000(Becausecloudflaredis in the same Docker network as LiteLLM, it routes directly by container name!)
- Subdomain: e.g.,
Securing the Dashboard while Exposing the API
To protect the LiteLLM admin dashboard behind Cloudflare authentication while allowing automated API clients to connect freely:
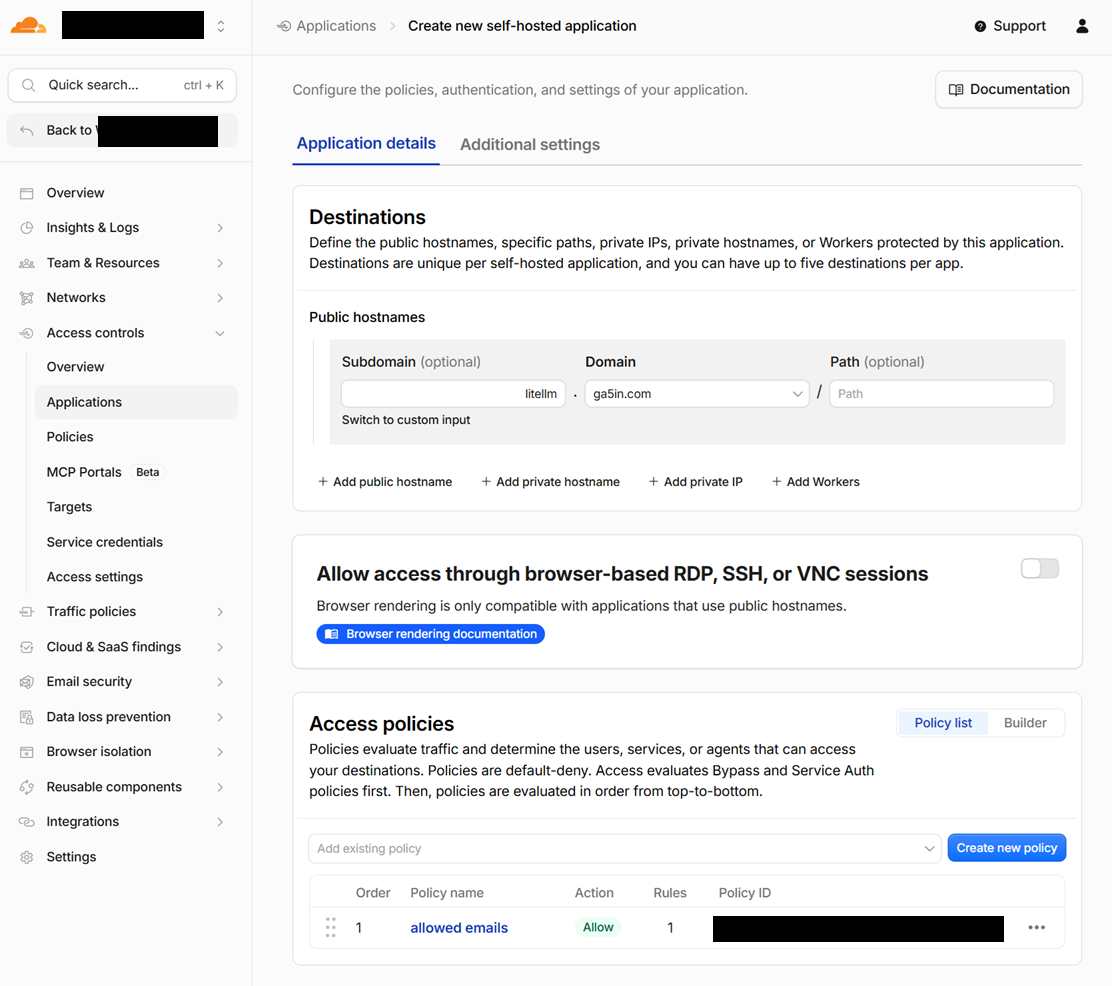
1. Protect the Management UI
In Access > Applications > Add an application > Self-hosted:
- Application Name:
LiteLLM Admin UI - Domain:
ai.yourdomain.com(leave Path empty). - Access Policy: Create an Allow rule restricted to your email address (OTP login).
2. Allow API Traffic to Bypass Browser Auth
In Access > Applications > Add an application > Self-hosted:
- Application Name:
LiteLLM API Bypass - Domain:
ai.yourdomain.com - Path:
v1* - Access Policy: Set the Action to Bypass for Everyone.
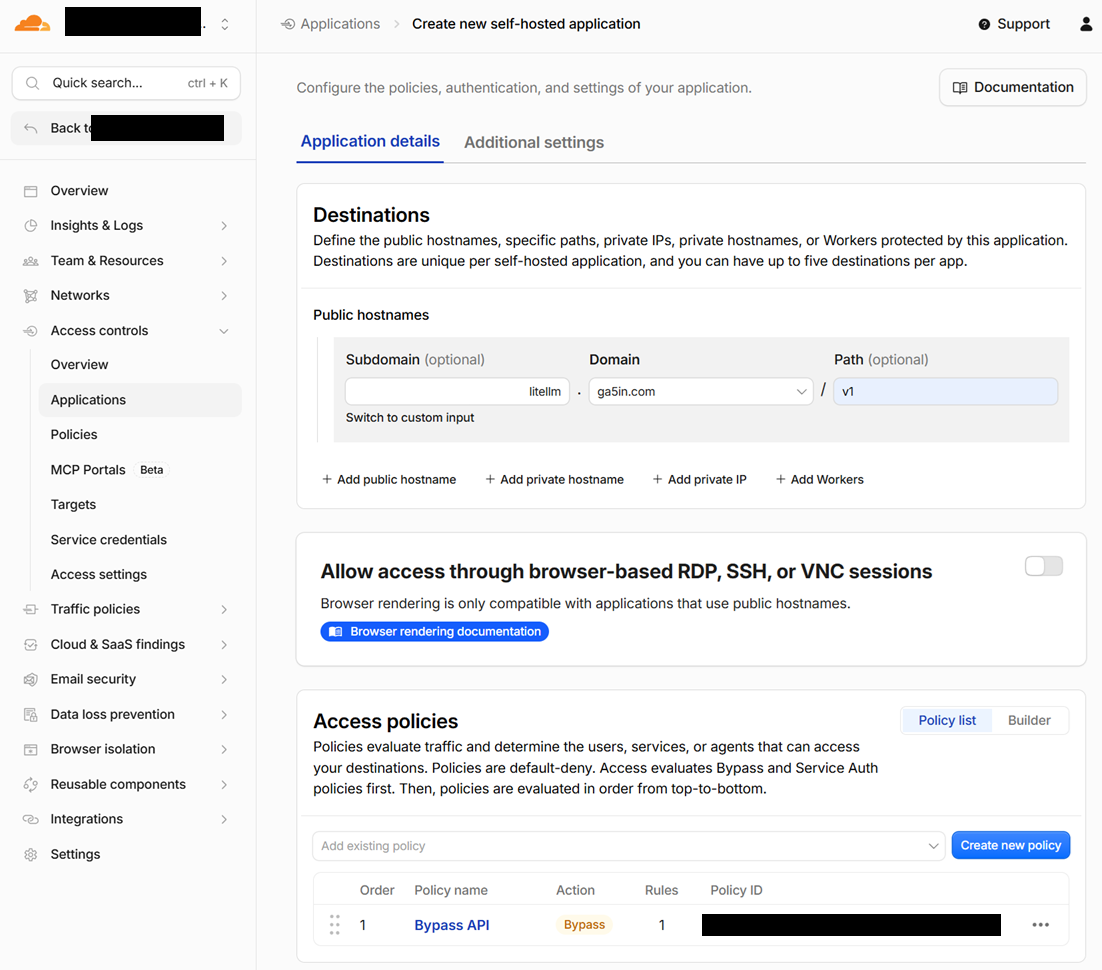
Now, navigating to https://ai.yourdomain.com requires an email login pin, but requests sent to https://ai.yourdomain.com/v1/chat/completions pass straight to LiteLLM, where your virtual API keys enforce authentication.
4. Testing & Connecting Remote Clients
You now have an encrypted, authenticated OpenAI-compatible API backed by your local GPU.
Testing with cURL
curl https://ai.yourdomain.com/v1/chat/completions \
  -H "Content-Type: application/json" \
  -H "Authorization: Bearer sk-your-litellm-virtual-key" \
  -d '{
    "model": "qwen-3.8",
    "messages": [{"role": "user", "content": "Hello from outside the home network!"}]
  }'
Client Integrations
Because the endpoint adheres to the standard OpenAI API specification, you can plug it into almost anything:
- Agentic Frameworks & Bots: Connect autonomous agent platforms like OpenClaw or Hermes by supplying your Cloudflare endpoint and LiteLLM virtual key as the backend model provider.
- IDEs & Coding Agents: Plug your endpoint into Cursor, Roo Code, Aider, or Continue.dev to use Qwen 3.8, Nemotron Flash, or Gemma 4 on your home GPU when coding remotely.
- Mobile Apps: Connect mobile chat clients like Enchanted (iOS/macOS) or Chatbox by pointing the OpenAI Base URL to
https://ai.yourdomain.com/v1. - Remote Web Interfaces: Self-hosted chat UIs like Open WebUI or LibreChat.
Conclusion
Exposing local hardware to the internet used to feel like a high-wire act of dynamic DNS scripts, port forwarding risks, and messy authentication workarounds. By chaining LM Studio, LiteLLM, and Cloudflare Tunnels together, you get the best of both worlds: full control over your local compute, zero open inbound router ports, and a standardized OpenAI-compatible gateway you can connect to any phone app, IDE, or agent on the go.
Splitting the setup across two machines—keeping the Docker proxy online 24/7 while letting the RTX 5060 Ti workstation handle inference dynamically—strikes the perfect balance between accessibility and power efficiency.
If you’ve got a modern GPU and a home server, give this pipeline a try—it’s rock solid and makes self-hosted AI feel just as accessible as any cloud API.